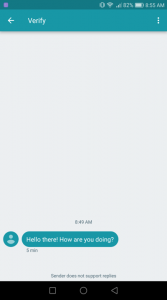
A web based SMS sender can be a very handy tool any developer out there, which can be used for a wide range of use cases such as sending notifications to your application’s users as well as to perform an innocent prank on a friend 😉.
With the use of rapidly evolving serverless technologies and services, we can now build our own SMS sender within a matter of a few minutes. So in this article, let’s see how we can leverage AWS APIGateway, lambda and SNS (Simple Notification Service) to build a quick and simple SMS sender within 10 minutes.
AWS SNS supports sending SMS messages to more than 200 countries and you can check the pricing for each country from their global pricing page.
What we are expecting to do is to expose an HTTP endpoint which will accept POST requests with a JSON payload of the following format. Then the lambda function will process the request and send the given message to the given receiver through SNS.
{
    "receiver": "+1123456789",
    "sender": "MySMS",
    "message": "Hello there! How are you doing?"
}
For this we are going to use SLAppForge Sigma, the user-friendly and easy-to-use IDE for serverless applications. If you haven’t used Sigma before no need to worry. Just signup for a free account and create a new Sigma project by following the few simple steps mentioned in this guide.
1. Adding the API Gateway trigger
Our first step is to define an API Gateway endpoint to accept requests and set it as the trigger for our lambda function.
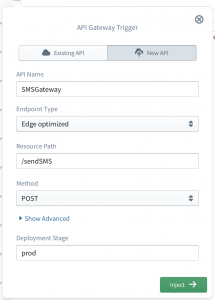
For that, drag an API Gateway resource from the resource panel on the left and drop it on top of the red coloured event variable of the lambda function. Then on the configuration panel, fill the APIGateway details as follows.
You can use any value you like for the API name, resource path and also for the deployment stage, but make sure that the method is selected as POST.
Once you are done, click on Inject button to add the trigger. Now the event variable should have been turned into green.
2. Extracting the values from API request
Our next task is to extract the necessary information such as the message to be sent, receiver’s phone number and sender name from the request. When the conventional API Gateway-Lambda integration is used (as we have done), the request payload received by the API will be injected to the lambda function as the event object. So here we only have to extract the above information from the event object and assign them to variables for further use as follows.
let AWS = require('aws-sdk');
exports.handler = function(event, context, callback) {

    let receiver = event['receiver'];
    let sender = event['sender'];
    let message = event['message'];

    console.log("Sending message", message, "to receiver", receiver);

    callback(null,'Successfully executed');
}
3. Sending the SMS
Then the final step is to use AWS SNS to send the given message as a SMS to the receiver.
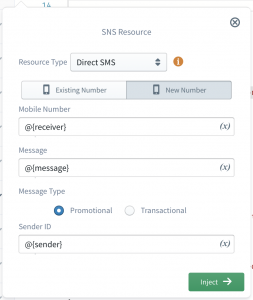
For that drag a SNS resource from the resource panel on the left and drop it on the line before the callback function (line 9 as per above code). Then on the configuration panel, select Resource Type as Direct SMS.
Then you need to provide the mobile number to send the SMS, the message to be sent, as well as the sender ID. For all these 3 fields, you can either provide constant values or variable names that hold the actual values. In our scenario also, we need to use the variables receiver , message and sender respectively as the variable names. So provide these variable names in the format @{VAR_NAME} to indicate that a variable name is in use and the IDE will even suggest the available variables as you type.
Once you are done, click on the Inject button to generate the code snippet for this configuration. We can implement the callback functions of the generated code by moving the lambda callback inside them and also adding some console logs. After that, the final code should look as follows.
let AWS = require('aws-sdk');
const sns = new AWS.SNS();
exports.handler = function (event, context, callback) {

	let receiver = event['receiver'];
	let sender = event['sender'];
	let message = event['message'];

	let isPromotional = true;

	console.log("Sending message", message, "to receiver", receiver);

	sns.publish({
		Message: message,
		MessageAttributes: {
			'AWS.SNS.SMS.SMSType': {
				DataType: 'String',
				StringValue: 'Promotional'
			},
			'AWS.SNS.SMS.SenderID': {
				DataType: 'String',
				StringValue: sender
			},
		},
		PhoneNumber: receiver
	}).promise()
		.then(data => {
			console.log("Sent message to", receiver);
			callback(null, data);
		})
		.catch(err => {
			console.log("Sending failed", err);
			callback(err);
		});
}
Something about the Sender ID…
As per the AWS documentation, above sender ID can be a custom ID that contains up to 11 alphanumeric characters, including at least one letter and no spaces. The sender ID is displayed as the message sender on the receiving device. But the support for sender IDs varies by country and/or region. You can check which countries support it from this table.
And about Message Type?
While configuring the above details, you may have noticed a property named Message Type, which can be either Promotional or Transactional. The difference between these 2 types is that,
- Promotional type should be used for non-critical messages, such as marketing messages as Amazon SNS optimizes the message delivery to incur the lowest cost.
- Transactional type should be used for Critical messages that support customer transactions, such as one-time passcodes for multi-factor authentication as Amazon SNS optimizes the message delivery to achieve the highest reliability.
Now we have completed the development of our SMS sender, it’s time to save it and deploy it. So click on the deploy button at the toolbar and it will first prompt you to commit the project to your GitHub repository. Once it is committed successfully the build process will be executed, followed by the deployment process.
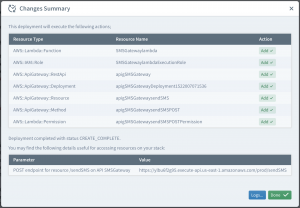
Once the deployment is done, you will see a deployment summary similar to the following.
At the upper part of the summary, you can see a list of resources that have been created as a result of this deployment and on the bottom you can see the URL to access our API gateway endpoint.
Make a note of this URL and then use a HTTP client to make a POST request of the following format to this URL.
{
    "receiver": "+1123456789",
    "sender": "MySMS",
    "message": "Hello there! How are you doing?"
}
If all goes well, you will receive a response of the following format and also a SMS message to the provided number 😀.
{
    "ResponseMetadata": {
        "RequestId": "6ff1ee9a-3398-5a7a-a0a1-bdabcc0c9574"
    },
    "MessageId": "f24a0fd5-4731-5a64-963f-5ce4b8a5c56a"
}If you need it, you can find the complete project repository here.
A video tutorial of this article is can be found below.


