Why do we need a File Uploader?
When you are working as an engineer for a software development company, it is apparent that you have to troubleshoot issues reported by the users of your software. In such a case, more often than not, you need to get various types of files from your customer for these troubleshooting purposes. For example, you may request them to send the application log files to troubleshoot a certain issue they are facing in their production environment. Or they may be facing a UI related issue and need to share some screenshots with you.
In this kind of a scenario, an HTTP based file uploader comes handy. The main functionalities of such a file uploader are as follows.
- Expose an HTTP/S endpoint (preferably PUT or POST) so the customers can invoke that endpoint with the file they want to share with you
- Receive the file from the HTTP request and store it in a secured file storage
In addition to the above main functionalities, the following can also be added as useful features of such a file uploader.
- Provide a web interface to make the file upload request to the above HTTP endpoint
- Send notification to the engineer that a file has been uploaded
What are we going to create?
In this article, we are going to implement a serverless file uploader with the above-mentioned main functionalities, utilizing AWS provided services such as API Gateway, Lambda, and S3. For the development and deployment of the solution, we are going to use SLAppForge Sigma, which is a purposely-built IDE for serverless applications.
If you don’t have a Sigma account, you can sign-up for a free account. After signing and confirming your email, please follow this getting started guide to set up the rest of your account.

Let’s implement our application
1. Create a new project
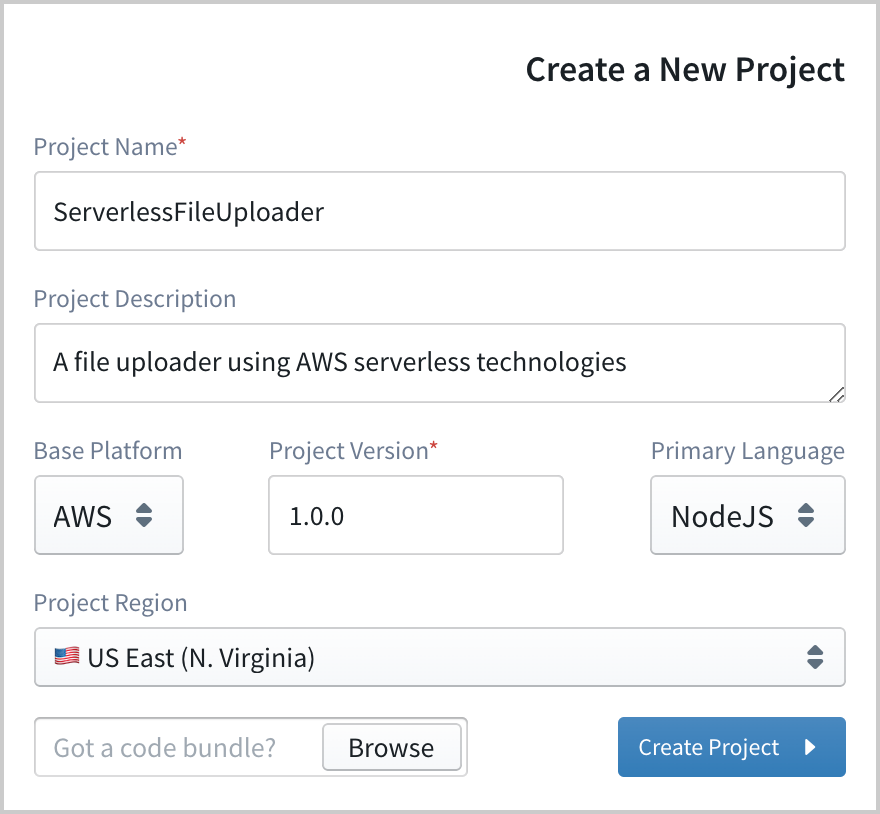
Once your Sigma account is set up, let’s first create a new Sigma project for our application. For that, provide a project name (e.g.: ServerlessFileUploader) and a version as you desired, and optionally you can provide a project description as well. Since we are going to deploy this application on AWS, keep the Base Platform as AWS and select any AWS region for the deployment.
In this article, we are going to implement the application using NodeJS. So let’s choose NodeJS as the primary language. Then click on the Create Project button to go into the editor.
Once the editor is opened, you can see that a Lambda file with your project name has been already added to the project with a basic code skeleton.
2. Add an HTTP API Gateway trigger
Our first task is to define an API Gateway and set it as a trigger for this Lambda function. AWS provides 3 flavors of their API Gateway as REST APIs, HTTP APIs, and WebSocket APIs. For our purpose, we can use either a REST or an HTTP API. In this article, we are going to use an HTTP API, which is recently introduced by AWS. In our context, using an HTTP API has the following advantages over a REST API.
- Low Cost – HTTP API pricing starts at $1.00 per million requests, which is nearly 70% cheaper than a REST API.
- Low Latency – The latency associated with an HTTP API is almost 50% of the latency of a similar REST API, due to the feature simplicity.
- Better handling of Binary Payloads – HTTP APIs handle binary payloads (such as image files) without setting up any complex custom configurations
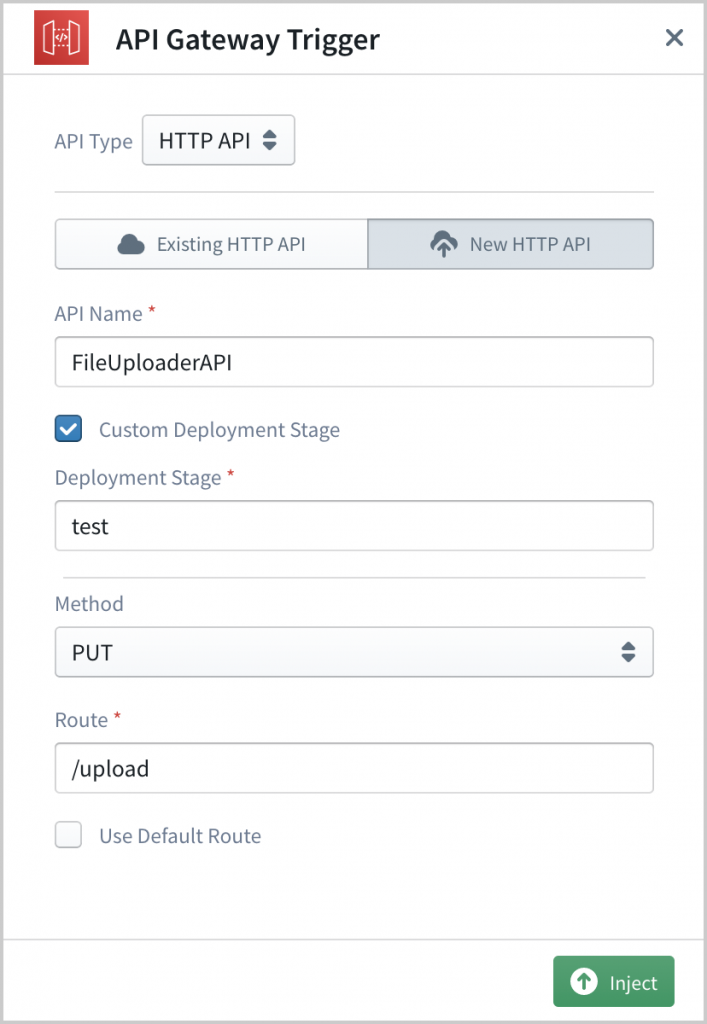
To set an API Gateway as Lambda trigger, click on the API Gateway block on the left side Resources panel and drag-drop it on to the event variable of the Lambda handler. It will open the API Gateway configuration panel on the right side of the editor.
On the configuration panel, select API Type as HTTP API and provide a suitable name for the API (e.g.: FileUploaderAPI). For the deployment stage, we can either use the default stage or define a custom stage. To define a custom stage, check the Custom Deployment Stage checkbox and then provide a valid name (e.g: test) for the stage name. (This stage name can only contain alpha-numeric characters or the underscore character.)
Then we are going to use PUT as the HTTP method and /upload as the route for accepting file upload requests.
Once all these fields have been configured correctly, click on the Inject button to set the API Gateway as the trigger for the Lambda function. Now you will see that the trigger icon in front of the Lambda handler has been turned green. You can click it to do any changes to the API trigger if required.
3. Extracting the file content from the request
When an HTTP API Gateway is set as a trigger for a Lambda function, the Lambda event variable contains the HTTP request details such as headers, path parameters, query parameters, and the payload. A sample such event can be found below.
https://gist.github.com/Udith/e0487ff91842f693f5f51a64f11e6142
If the request is a file upload, the file content is sent in the body field of the event. If the file content is a text format such as CSV, this raw content is sent in the above field. Else, if the file content is a binary type such as an image, that content is sent in Base64 encoded format. In the latter case, the isBase64Encoded field of the event is set to true as well.
Therefore our next step is to extract this file content from the event object. Since we need to support both binary and text-formatted files, we have to identify the Base64 encoded payloads and decode them accordingly.
We can implement this functionality as follows.
let fileContent = event.isBase64Encoded ? Buffer.from(event.body, 'base64') : event.body;
4. Generating the file name
Our next task is to generate a name for the file to be stored in S3. For the file name part, we are going to use the current epoch timestamp in milliseconds, which makes it easier to identify a file uploaded at a given time. We can implement this functionality as follows.
let fileName = `${Date.now()}`;
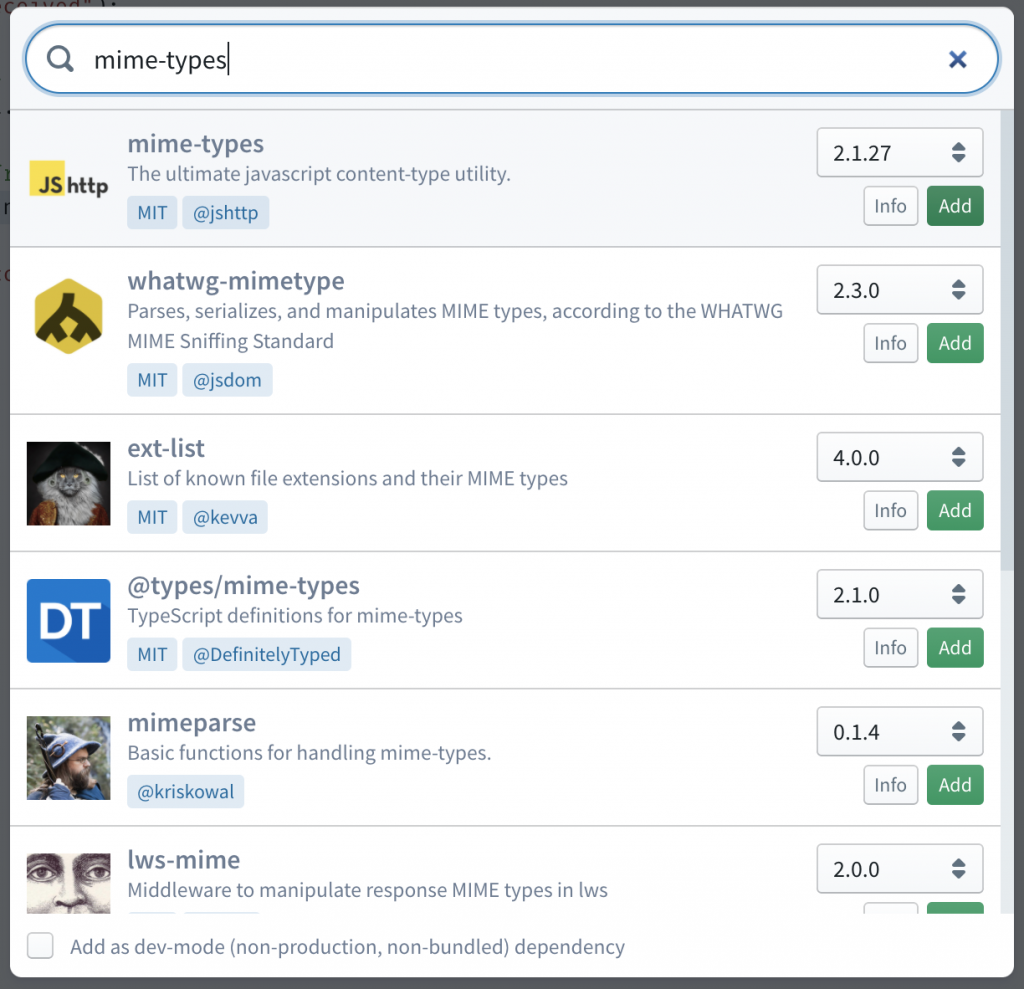
Then the complex task is to determine the extension of the file. For that, one option is to ask the file uploader to include an HTTP header with the original file name so that we can extract the extension from that name. The other option is to determine the file extension based on the content-type header of the HTTP request. For that approach, we can use an NPM library such as mime-types without implementing it from scratch.
One of the useful features of Sigma IDE is the capability to search and add NPM dependencies to the project from IDE itself. For that click on the Add Dependencies button on the toolbar and search for the above library. Once you found the library on the search results list, click on the Add button to add it as a project dependency.
Then we can determine the file extension as follows.
let contentType = event.headers['content-type'] || event.headers['Content-Type'];
let extension = contentType ? mime.extension(contentType) : '';
The full file name can be generated by combining the above 2 parts as follows.
let fullFileName = extension ? `${fileName}.${extension}` : fileName;
5. Uploading the file content to S3
The final task of our implementation is to define an S3 bucket and implement the code to store these files into that bucket. For that drag-n-drop the S3 block from the resources panel onto the code editor line where we need to put our upload code snippet. Similar to API Gateway, this will also open the S3 configuration panel.
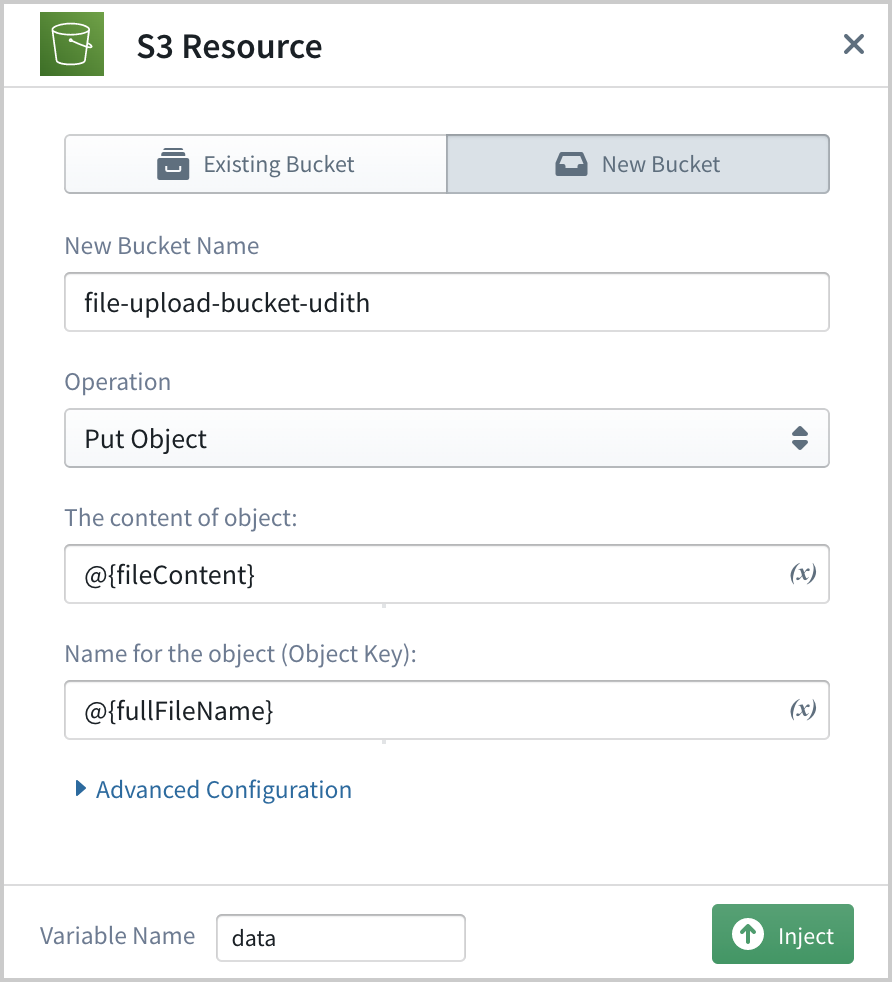
Since we are going to create a new bucket to store the uploaded files, go to the New Bucket tab and provide a name for the bucket and select the operation as Put Object.
Then for the content of the object field, we need to provide the fileContent variable we defined earlier. Since Sigma supports providing variables in the configuration fields with the syntax @{varname}, we can set the value for the field as @{fileContent}. Similarly, we can set the value for the Object Key field as @{fullFileName}.
Once these values are set, click on the Inject button to generate the code snippet and inject it into the editor.
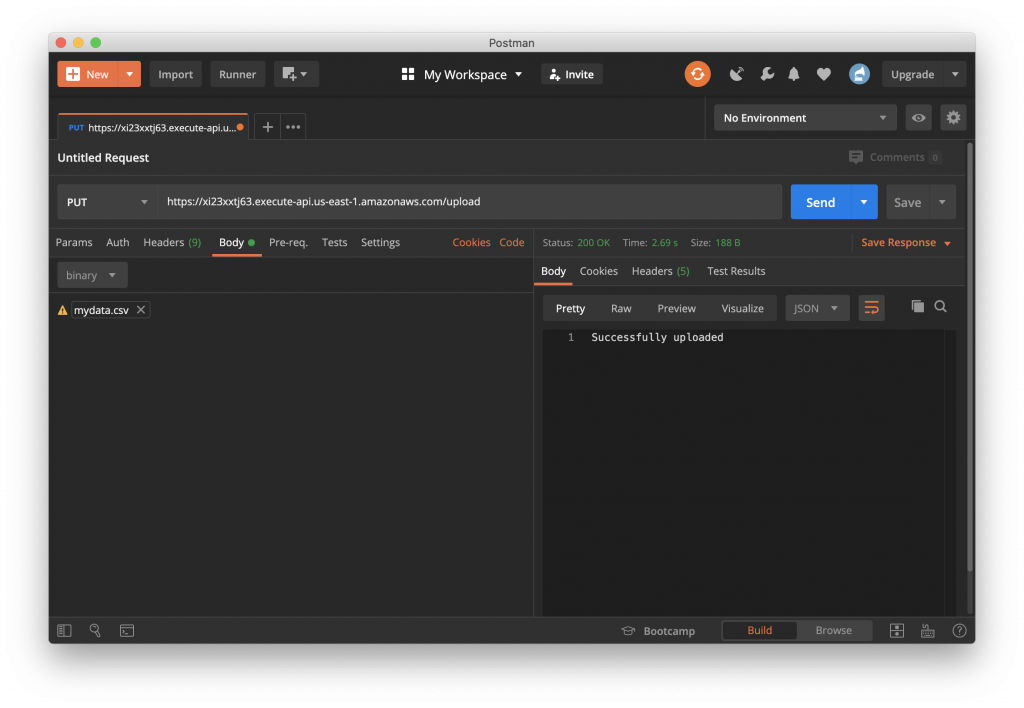
In the successful file upload scenario, we are going to print a logline and then return the message “Successfully uploaded“. In that case, the user who uploaded the file will receive an HTTP 200 response with this message as the response. In the failure scenario, we are going to log the error message and then throw the error, so that the user will receive an HTTP 500 response indicating an error.
try {
    let data = await s3.putObject({
        Bucket: "file-upload-bucket",
        Key: fullFileName,
        Body: fileContent,
        Metadata: {}
    }).promise();

    console.log("Successfully uploaded file", fullFileName);
    return "Successfully uploaded";

} catch (err) {
    console.log("Failed to upload file", fullFileName, err);
    throw err;
};
The full implementation of the Lambda is as follows.
6. Saving and Deploying the project
Since now our project implementation is complete, we can save it into a Git repository and deploy it into our AWS account.
To save the project, click on the Save button on the toolbar. Then if you haven’t already integrated Sigma with a VCS provider, you can choose either GitHub, BitBucket, or GitLab to integrate with. Once successfully integrated, you can commit your changes to a repository with the desired name. In case you are a premium user, you can commit to a private repository as well.
Sigma provides the capability to deploy your project even without saving it into a VCS repository. But it is recommended to save and then deploy as a best practice.
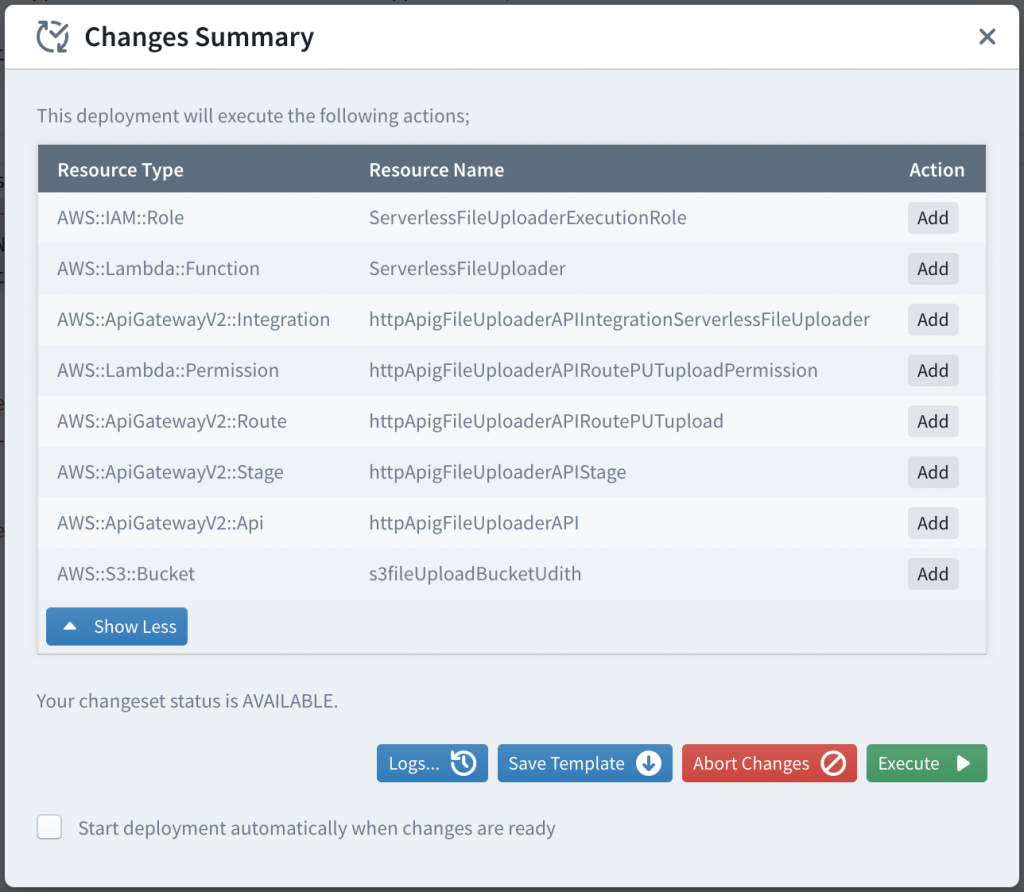
After committing the changes, click on the Deploy button to deploy your application to the AWS account. Sigma will automatically build your project and then display a list of actions that are to be performed on your AWS account during the deployment. The changeset will look similar to below.
In summary, the following are the entities that will be added into your AWS account as per this changeset.
- ServerlessFileUploader Lambda function
- IAM role to be used as the execution role of the above Lambda function. (Sigma should have automatically added the necessary permissions to for the S3 upload)
- An HTTP API
- A custom deployment stage for the above API
- A route for the above API for PUT method on /upload path
- An integration between the above route and the Lambda function
- Permissions for the above API to invoke Lambda function
- An S3 bucket
Since these changes look fine, we can click on the Execute button to start the deployment. Once the deployment is completed successfully, you will get an output similar to the following, containing the URL of the API endpoint and the Lambda ARN.

You can use an HTTP client such as Postman to make a PUT request to this endpoint with a file attached as the payload. Both textual files such as CSV and binary files such as image files should work without any difference.
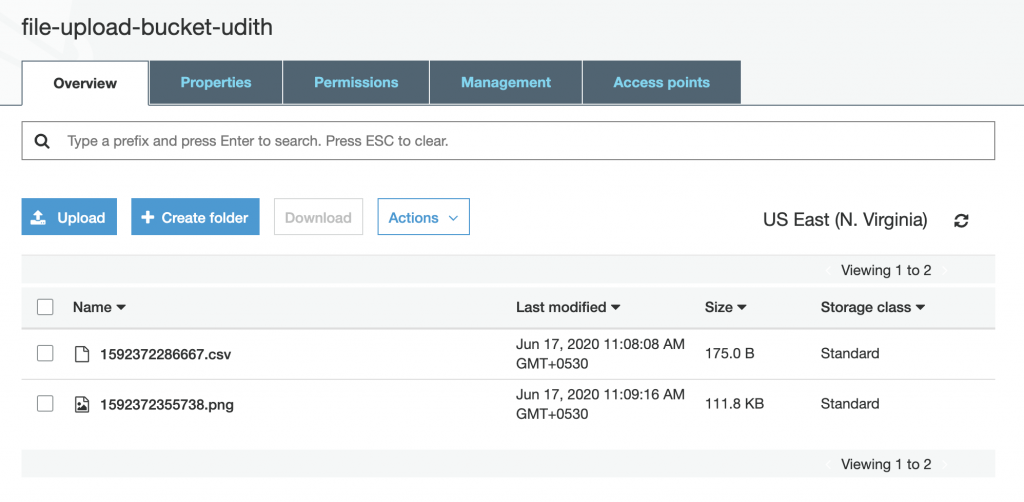
Once the file upload is successful, you can log into your AWS S3 console and check the newly created bucket for the uploaded files.
Now we have a fully functioning serverless file uploader, that we can share with our clients to share their files.


